背景与架构设计

网络中存在的挑战

  • 挑战1:Kubernetes 的每个 Pod 拥有一个独立的 IP 地址。对外部访问则依赖 NodePort、LoadBalancer 或 Ingress,出于安全考虑不可能对每个 Pod 都暴露其 8849 端口 (NodePort) 或者使用 Ingress 配置大量的域名,这样无法连接到单独的某一个 Pod (通过Service)。
  • 挑战2:网络环境是完全隔离的,用户无法通过 Pod IP 直接访问 Pod,所有的用户流量只能通过对应 IDC 的唯一入口进入。
  • 挑战3:出于安全考虑不可能对每一个 Java 服务 (Pod) 在他的工作周期期间所有时间都暴露对应的 Jprofiler 端口,而仅仅想使用时可以连接,用后关闭。

JProfiler网络需求

JProfiler 可以通过加载 JVM 代理(libjprofilerti.so)与远程 GUI 通信,他的实现原理如下:

  1. JVM 启动时加载 JProfiler 代理,绑定到一个特定端口(如 8849)。
  2. 本地 JProfiler GUI 通过该端口连接到远程 JVM。
  3. 代理与 GUI 之间通过 TCP 传输性能数据。

在 Kubernetes 中,JProfiler 代理运行在 Pod 内部,但由于网络隔离和动态 IP,GUI 无法直接连接到 Pod。因此,我们需要一种机制将 JProfiler 的端口动态映射到可访问的外部端点。

需要实现的架构

下图是基于上面提到的问题从而设计的集群架构

image-20220516174123726

图:最终网络架构设计和流量路线图

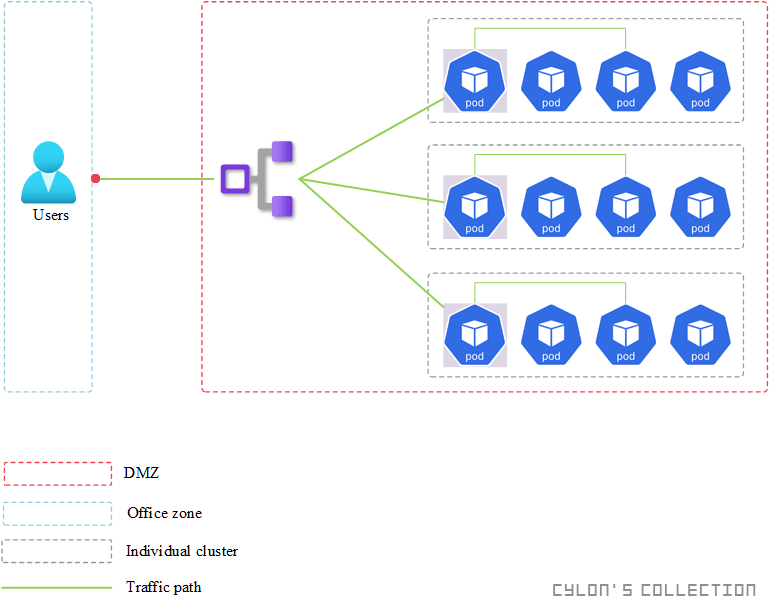
上图可以看到,用户办公网络和 IDC 网络是完全隔离的,办公网络到 IDC 只有唯一入口,这里成为 LB,所有的流量都必须经由固定的 LB 进入,灰色背景的 Pod 是代理 Pod, 他可以动态的将流量转发到对应的用户真实想请求的 Pod 中。

解决方案

需要完成的步骤为

  1. 让业务Pod 接入JProfiler agent:使用 Init Container 将 JProfiler 所需库安装到 Pod 的共享卷中。
  2. 需要一个代理软件,用于转发 TCP 流量,让其可以作为一个唯一入口,但这个入口使用并不频繁。
  3. 可以实现转发的触发的工具。

综上所述,这里无法使用 ingress/gateway 资源作为映射了。

最终技术栈选择

软件版本版本下载地址
Kubernetes集群支持 1.16 以上的版本,并且不要对 Kubernetes 版本有依赖
JProfiler14.0docker pull cylonchau/jprofiler-agent:14_0 [2]
pod-proxier0.4docker pull cylonchau/pod-proxier:0.4

表中 pod-proxier 是自实现的一个控制器,主要功能完成 Pod 映射 (通过 HTTP API), 底层使用了 haproxy 实现。

实施步骤

安装pod-proxier

下面是 pod-proxier 的部署清单

yaml
  1
  2
  3
  4
  5
  6
  7
  8
  9
 10
 11
 12
 13
 14
 15
 16
 17
 18
 19
 20
 21
 22
 23
 24
 25
 26
 27
 28
 29
 30
 31
 32
 33
 34
 35
 36
 37
 38
 39
 40
 41
 42
 43
 44
 45
 46
 47
 48
 49
 50
 51
 52
 53
 54
 55
 56
 57
 58
 59
 60
 61
 62
 63
 64
 65
 66
 67
 68
 69
 70
 71
 72
 73
 74
 75
 76
 77
 78
 79
 80
 81
 82
 83
 84
 85
 86
 87
 88
 89
 90
 91
 92
 93
 94
 95
 96
 97
 98
 99
100
101
102
103
104
105
106
107
108
109
110
apiVersion: rbac.authorization.k8s.io/v1
kind: ClusterRole
metadata:
  name: pod-proxier-secret-reader
rules:
  - apiGroups: [""]
    resources: ["pods"]
    verbs: ["get", "watch", "list"]
---
apiVersion: rbac.authorization.k8s.io/v1
kind: ClusterRoleBinding
metadata:
  name: pod-proxier-rolebinding
subjects:
  - kind: ServiceAccount
    name: pod-proxier-secret-sa
    namespace: infra
roleRef:
  kind: ClusterRole
  name: pod-proxier-secret-reader
  apiGroup: rbac.authorization.k8s.io
---
apiVersion: v1
kind: ServiceAccount
metadata:
  namespace: infra
  name: pod-proxier-secret-sa
---
apiVersion: apps/v1
kind: Deployment
metadata:
  name: pod-proxier
  namespace: infra
spec:
  replicas: 1
  selector:
    matchLabels:
      app: pod-proxier
  strategy:
    type: Recreate
  template:
    metadata:
      labels:
        app: pod-proxier
    spec:
      serviceAccount: pod-proxier-secret-sa
      # 这里使用了host网络,直接对架构图LB组件
      hostNetwork: true
      # 这里要看你的网络设施,我这里使用了固定的Node
      nodeName: {your_pod_running_at_node}
      containers:
        - name: pod-proxier-ints
          image: cylonchau/pod-proxier-ints:v2.6.1
          ports:
          - containerPort: 8404
            hostPort: 8404
            name: admin-port
            protocol: TCP
          - containerPort: 5555
            name: data-plan-port
            protocol: TCP
          - containerPort: 8849
            hostPort: 8849
            name: entry-port
            protocol: TCP
          readinessProbe:
            httpGet:
              path: /stats
              port: 8404
            initialDelaySeconds: 2
            periodSeconds: 60
          livenessProbe:
            httpGet:
              path: /stats
              port: 8404
            initialDelaySeconds: 10
            periodSeconds: 60
        - name: pod-proxier
          image: cylonchau/pod-proxier:0.4
          imagePullPolicy: IfNotPresent
          ports:
          - containerPort: 3343
          securityContext:
            runAsNonRoot: true
            runAsUser: 1000
          command:
            - "sh"
            - "-c"
            - |
              sleep 15 &&
              /apps/pod-proxier-gateway
              -v 5
              --listen-port=3343
              --listen-address 0.0.0.0
              --default-map-port=8848
              # 这个参数指定了从Pod中映射哪个端口,只有符合这个值的端口才能被映射
              --jprofiler-port-name=jprofiler-port
              --resync-time=600              
          readinessProbe:
            httpGet:
              path: /health
              port: 3343
            initialDelaySeconds: 10
            periodSeconds: 2
          livenessProbe:
            httpGet:
              path: /health
              port: 3343
            initialDelaySeconds: 10
            periodSeconds: 60

配置service(可选)

如果是公有云环境,可以通过公有云 LB 来映射

yaml
 1
 2
 3
 4
 5
 6
 7
 8
 9
10
11
12
13
14
15
16
17
18
19
20
21
22
23
24
25
26
27
apiVersion: v1
kind: Service
metadata:
  name: jprofiler-proxier
  namespace: infra
  labels:
    app: app: pod-proxier
  annotations:
    # 下面实例是aws上配置LB的参数
    service.beta.kubernetes.io/aws-load-balancer-type: "nlb"
	service.beta.kubernetes.io/aws-load-balancer-internal: "true"  
    service.beta.kubernetes.io/aws-load-balancer-subnets: subnet-0af9685c4effc54a3,subnet-03795506a78646acb
spec:
  type: LoadBalancer
  ports:
    - port: 8849
      targetPort: 8849
      protocol: TCP
      name: haproxy
    - port: 8404
      targetPort: 8404
      protocol: TCP
      name: proxier	 
  selector:
    app: app: pod-proxier
  loadBalancerSourceRanges:
    - "0.0.0.0/0" 
note
Helm部署可以参考:github.com/cylonchau/pod-proxier/helm

Pod 启动 jprofiler agent 的方式

再次之前需要了解 Jprofiler 在 kubernetes 集群中运行的方法有:

  • 方法1:打包至业务Pod容器内(缺点:需要侵入业务Pod内。不方便)。
  • 方法2:使用 Init Container 将 jprofiler 安装复制到 InitContainer 和将在 Pod 中启动的其他容器之间共享卷。
  • 方法3:使用 sidecar 方式共享业务 Pod 与 sidecar 共享名称空间。
    • 缺点:
      • 涉及到容器共享进程空间,与 jprofiler-agent 机制问题,所以需要共享 /tmp 目录。
      • 需要手动触发启动 jprofiler。

JProfiler finds JVMs via the “Attach API” that is part of the JDK. Have a look at the $TMP/hsperfdata_$USER directory, which is created by the hot spot JVM. It should contain PID files for all running JVMs. If not, delete the directory and restart all JVMs.

这里选择使用 “方法2” ;制作 initContainer [1] 方式如下:

yaml
 1
 2
 3
 4
 5
 6
 7
 8
 9
10
11
12
13
14
15
16
17
18
19
20
21
22
23
24
25
26
27
28
29
30
31
FROM centos:7

# Switch to root
USER 0

ENV \
 JPROFILER_DISTRO="jprofiler_linux_14_1_1.tar.gz" \
 STAGING_DIR="/jprofiler-staging" \
 HOME="/jprofiler"

LABEL \
 io.k8s.display-name="JProfiler from ${JPROFILER_DISTRO}"

RUN yum -y update \
 && yum -y install ca-certificates curl \
 && mkdir -p ${HOME} ${STAGING_DIR} \
 && cd ${STAGING_DIR} \
 # curl is expected to be available; wget would work, too
 # Add User-Agent header to pretend to be a browser and avoid getting HTTP 404 response
 && curl -v -OL "https://download-keycdn.ej-technologies.com/jprofiler/${JPROFILER_DISTRO}" -H "User-Agent: Mozilla/5.0 (Macintosh; Intel Mac OS X 10_12_6) AppleWebKit/537.36 (KHTML, like Gecko) Chrome/67.0.3396.62 Safari/537.36" \
 && tar -xzf ${JPROFILER_DISTRO} \
 && rm -f ${JPROFILER_DISTRO} \
 # Eliminate the version-specific directory
 && cp -R */* ${HOME} \
 && rm -Rf ${STAGING_DIR} \
 && chmod -R 0775 ${HOME} \
 && yum clean all

# chown and switch user as needed

WORKDIR ${HOME}

使用 Init Container 为 Pod 注入 jprofiler agent

更改应用程序的部署配置如下

  • 如果尚未定义,请在 “spec.template.spec” 下添加 “volumes” 部分并定义一个新卷,用于给 initContainer 和 mainContainer 提供初始化
yaml
1
2
3
volumes:
  - name: jprofiler-share-tmp
    emptyDir: {}

如果尚未定义,请在 “spec.template.spec” 下添加 “initContainers”(Kubernetes 1.6+),并使用 JProfiler 的镜像定义 Init Container 将 Init container 中的文件复制到共享目录

yaml
1
2
3
4
5
6
7
initContainers:
  - name: jprofiler-init
    image: <JPROFILER_IMAGE:TAG>
    command: ["/bin/sh", "-c", "cp -R /jprofiler/ /tmp/"]
    volumeMounts:
      - name: jprofiler
        mountPath: "/tmp/jprofiler"

将 jprofiler-agent 添加到 JVM 启动参数。

yaml
1
-agentpath:/jprofiler/bin/linux-x64/libjprofilerti.so=port=8849

完整的Deployment 示例

yaml
 1
 2
 3
 4
 5
 6
 7
 8
 9
10
11
12
13
14
15
16
17
18
19
20
21
22
23
24
25
26
27
28
29
30
31
32
33
34
35
36
37
38
39
40
41
42
43
apiVersion: apps/v1
kind: Deployment
metadata:
  name: jprofiler-test
spec:
  replicas: 1
  selector:
    matchLabels:
      app: jprofiler
  template:
    metadata:
      labels:
        app: jprofiler
    spec:
      volumes:
      - name: jprofiler-share-tmp
        emptyDir: {}
      shareProcessNamespace: true
      initContainers:
      - name: jprofiler-init
        image: jprofiler:14_0
        command: ["/bin/sh", "-c", "cp -R /jprofiler/ /tmp/"]
        volumeMounts:
          - name: jprofiler-share-tmp
            mountPath: "/tmp"
      containers:
        - name: sprintboot-test
          image:javaweb:3
          imagePullPolicy: IfNotPresent
          volumeMounts:
          - name: jprofiler-share-tmp
            mountPath: /tmp
          env:
          - name: JAVA_OPTS
          # nowait 表示启动时不需要手动确认,如果不加会stuck到 jprofiler,使得业务容器不能启动
          # -agentpath 必须加到java参数后,而不是 java -jar xxx -agentpath 这样
            value: "-agentpath:/tmp/jprofiler/jprofiler14.0/bin/linux-x64/libjprofilerti.so=port=8849,nowait" 
          command: 
          - "java"
          - "-jar"
          - demo-0.0.1-SNAPSHOT.jar 
          args:
          - --server.port=8085

一个完整的 Deployment 示例清单

yaml
 1
 2
 3
 4
 5
 6
 7
 8
 9
10
11
12
13
14
15
16
17
18
19
20
21
22
23
24
25
26
27
28
29
30
31
32
33
34
35
36
37
38
39
40
41
42
43
44
45
46
47
48
49
50
51
52
53
54
55
56
57
apiVersion: apps/v1
kind: Deployment
metadata:
  labels:
    app: springboot-example-for-jprofiler
  name: springboot-example-for-jprofiler
  namespace: default
spec:
  replicas: 1
  selector:
    matchLabels:
      app: springboot-example-for-jprofiler
  template:
    metadata:
      labels:
        app: springboot-example-for-jprofiler
        name: springboot-example-for-jprofiler
    spec:
      initContainers:
      - name: jprofiler-init
        image: cylonchau/jprofiler-agent:14_0
        command: ["/bin/sh", "-c", "cp -R /jprofiler/ /tmp/"]
        volumeMounts:
          - name: jprofiler-share-tmp
            mountPath: "/tmp"
      containers:
      - name: springboot-example-for-jprofiler
        image: cylonchau/javaweb-example:v0.0.1
        imagePullPolicy: IfNotPresent
        volumeMounts:
          - name: jprofiler-share-tmp
            mountPath: /tmp
        env:
        - name: JAVA_OPTS
          value: -server
        - name: JAVA_TOOL_OPTIONS
          value: "-XX:MinRAMPercentage=25.0 -XX:MaxRAMPercentage=85.0 -XX:InitialRAMPercentage=25.0 -agentpath:/tmp/jprofiler/jprofiler14.0/bin/linux-x64/libjprofilerti.so=port=8849,nowait"
        command: 
          - "java"
          - "-jar"
          - demo-0.0.1-SNAPSHOT.jar 
          args:
          - --server.port=8085
        livenessProbe:
          failureThreshold: 3
          httpGet:
            path: /health
            port: 8080
            scheme: HTTP
          initialDelaySeconds: 240
          timeoutSeconds: 1
        ports:
        - containerPort: 8080
          protocol: TCP
        - containerPort: 8849
          name: jprofiler-port
          protocol: TCP

Service 相关 (可选)

yaml
 1
 2
 3
 4
 5
 6
 7
 8
 9
10
11
12
13
14
15
16
apiVersion: v1
kind: Service
metadata:
  labels:
    app: springboot-example-for-jprofiler
  name: springboot-example-for-jprofiler
  namespace: default
spec:
  ports:
    - name: tcp-80
      port: 80
      protocol: TCP
      targetPort: 8080 
  selector:
    app: springboot-example-for-jprofiler
  type: ClusterIP

如何动态映射 Pod

需要连接 jprofiler-agent,在启动时作为进程启动,然后映射 jprofiler-agent 的 8849 端口。使用 pod-proixer,使用 haproxy 映射 Pod,并且提供 HTTP API,可以控制映射,与映射生效时间。

--jprofiler-port-name,将会使用业务 Pod 配置的 Port name 来选择映射,而无需经过 ingress/gateway 。pod-proxier 本身有实现 Pod 映射的超时,所以不需要在去设计关闭映射部分了。

例如

bash
1
2
3
# @pod_name namespace_name/pod_name
# @time 最大3小时
curl -XPOST "10.10.10.10:3343/api/v1/mapping?pod_name=apollo/apollo-portal-5f8c6587d-g2wkx&time=60000"

交付

在可以完成所有的映射操作后,还需要可以把这部分交付给用户去使用,而不是让用户自己拼接 HTTP URL 来完成映射,这里思路可以接入到内部平台,每个 Pod 实例后增加一个按钮 “启用Jprofiler映射”;或者接入到工单系统,在审批后实现自动映射,超时自动关闭映射。可以参考 Apache Airflow, Stackstorm 之类作业平台来完成。

Reference

[1] How to Connect JProfiler to a JVM Running in Kubernetes Pod

[2] JProfiler download